How to use Partial Treatment Estimator
The Partial Treatment Estimator allows a user to calculate fertilizer for a partial treatment of a field and create an application file for only the area to be applied.
Example 1: A prescription was written in the fall and parts of the field are now too wet to spread in the spring. A partial treatment is created for the dry part of the field.
Example 2: The remaining part of the field has dried and can now be spread. A partial treatment is created for the area of the field left out in example one.
The following section describes how to create a partial treatment.
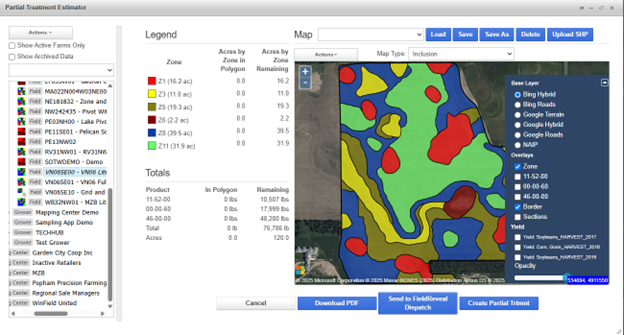
1. To open the tool, click Partial Treatment on the left-center of the window.
Partial Treatment Estimator
2. This tool works by allowing a user to exclude or include an area of the field. There are three ways to create an exclusion or inclusion area:
Draw a border
Select zones
Use a custom vector
Upload a Shapefile (EX: Planting As-Applied Shapefile)
Draw a Border
1. Click Actions > Draw Border
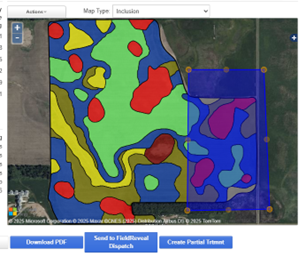
2. Draw the border on the map pane by left clicking. Right click to end the drawing operation.
3. To edit a border on the map pane, click Actions > Edit Vertices. Click inside of the field border. The selected border will highlight blue. Notice the orange dots around the outside. Click on these orange dots and drag them around to modify the border. To finish editing, click anywhere outside of the field border.
4. To delete the border and start over, click Actions > Delete Feature, and click on the border to delete it.
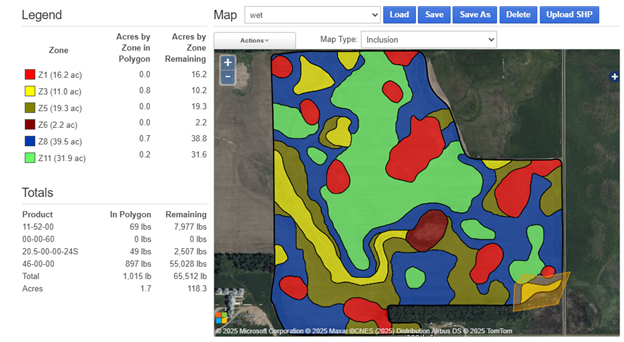
5. Review the Legend and Totals tables to see how many acres and pounds of product are inside and outside the polygon. Click on the + icon in the top-right corner of the map pane to view the spread maps, if desired.
6. The border drawn can be saved to the field as a custom vector for future reference. Above the map pane, click Save As and give the object a name. The custom vector will now be available from the dropdown list next to the word Map.
Select Zones
1. Click Actions > Select Zones.
2. On the map pane, click on the desired zone polygons to select them. In this example, the Zone 3’s are selected.
3. Review the Legend and Totals tables to see how many acres and pounds of product are inside and outside the polygon. Click on the + icon in the top-right corner of the map pane to view the spread maps, if desired.
Upload a Shapefile
1. Select the Upload SHP option on the far right.
2. The shapefile being uploaded must contain the three parts of a shapefile inside a ZIP folder. Use the Choose File button and navigate to the file on the computer. After selecting the file, enter in an Object Name. Select an Object Type if applicable. Some examples of the types are Irrigated, CRP, Manure, Trial, Weeds, etc.
3. Click Confirm. A green message will appear in the top right of the screen when the shapefile has been successfully loaded.
4. The imported shapefile will now be selectable under the dropdown next to Map.
Use a Custom Vector
Custom vectors saved to a field can be selected as an exclusion or inclusion area. Custom vectors can be saved to a field using the steps above in Draw a Border, in Prescription Builder > Map tab, uploading a shapefile or by the FieldReveal Mapping Center.
1. Click on the dropdown next to the word Map to see a list of custom vectors saved to the field.
2. Select a custom vector and click Load. The custom vector will load to the map pane.
3. Review the Legend and Totals tables to see how many acres and pounds of product are inside and outside the polygon. Click on the + icon in the top-right corner of the map pane to view the spread maps, if desired.
4. Select the desired partial treatment option. Click the Map Type dropdown menu above the map pane. There are two options, inclusion and exclusion.
Inclusion will only spread the area that is inside of the polygon(s) on the map, and will not spread the area that is on the remainder of the map.
Exclusion will not spread the area that is inside of the polygon(s) on the map, and will spread the area on the remainder of the map.
5. To view and print an updated report with application totals, click Download PDF at the bottom of the page.
6. To create the application file for the partial treatment, users have two options. Send to FieldReveal Dispatch will send the application file to the users dispatch software. This is for AgSync and Ground Control Online users. Create Partial Treatment will download the file to a computer.
Send to FieldReveal Dispatch
1. Click Send to FieldReveal Dispatch
2. Complete the Send to AgSync/Ground Control form and click Confirm.
3. A message will appear when the order has been successfully sent.
Create Partial Treatment
1. Click Create Partial Trtmnt
2. The Create Partial Treatment window opens. Choose the filetype from the Export Type dropdown and check smoothing if desired. Click Confirm. The file will download to your computer in a zipped folder.