Review Tab
Review
The Review tab allows a user to verify their application maps, rates, and totals are correct. It also is where the prescription and corresponding application files are created.
NOTE: The Mapping Center recommends reviewing the spread maps and rates before creating the prescription.
The following section describes how to:
View Application Maps
Create the Fertilizer Prescription
Create the Application Files
Create a Field Group Prescription
View Application Maps
1. Click the radio buttons to look at the individual products created from the prescription.
2. Select a product to view. This displays a map of the rates to be applied. The product legend is displayed next to the Map Pane. It is important to remember these rates are sorted from smallest to largest, not by zone. If each product map looks correct, the prescription and application files are ready to be created.
Create the Fertilizer Prescription
1. Click Create Fertilizer Rx.
2. Enter a name in the Create Fertilizer Rx window. The name will be pre-populated with the Crop_average yield goal_date. This can be changed. Click Confirm.
3. If an active prescription already exists, the program will notify the user and give them the option to Create Inactive, Create Active or cancel.
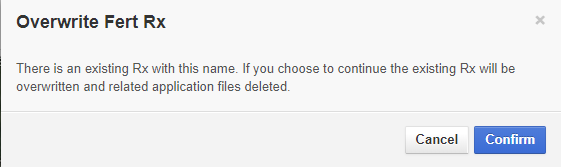
4. If a multiple prescriptions are created for the same field on the same day the program will notify the user to rename the new prescription or overwrite the existing prescription.
Create the Application Files
After the prescription has been created, the application files need to be created. See Create a Field Group Prescription for Field Groups.
1. Choose the desired file type from the dropdown menu located above the Create Application button.
2. Check the Smoothed Application box if a smoothed file is desired. This will create gradual changes between rates allowing for a more accurate application. Files are typically smoothed when being spread with high-speed application equipment. If a file is smoothed, it is recommended to set a Low Rate Adjustment in the Equations tab.
NOTE: It is important to know the maximum number of polygons per field the monitor will accept. Smoothing increases the number of polygons in the application file. For example, the Case Pro 700 has a polygon limit of 1000 and therefore smoothing is not recommended on the Pro 700.
3. After the file type and smoothing have been selected, click Create Application. If smoothing was selected, the Confirm Rx Smoothing window appears. This displays how much the product totals will change by choosing a Smoothed Application file. In the example below, the rates will vary up to 1.03% from the totals calculated in the prescription.
4. A message will appear when the application files have been created and published. This means the files are now available in Application Manager.
5. Multiple application file types can be created for a prescription, such as a shapefile and a Pro 700 .cn1, if needed. Simply choose the next filetype from the dropdown and click Create Application.
6. The next time a Tool is opened, the RX icon will now be shown next to the field ID in the Profile Selector.
Create a Field Group Prescription
Individual fields can be grouped together to create a Field Group. Once Field Grouped, a single application file can be created for the Field Group, instead of multiple application files for each field. This allows multiple fields to be planted or fertilized as one field. Only fields within the same Farm, and fields adjacent to each other can be Field Grouped. Fields can be grouped together by contacting your regional Mapping Center. Fields remain grouped until a request is made to un-group them.
The following steps describe how to create a Field Group prescription and application file.
1. Contact your regional Mapping Center to have fields grouped together.
2. Select the first field in the field group. The Field Group can be expanded by clicking the arrow next to the Field Group.
3. Write a prescription on the first field using the tabs. In the Review tab (fertilizer prescriptions)/VR Seed tab (seed prescriptions), click Create Fertilizer Rx and name the prescription. Do not click Create Application. Application files will be created on the last field in the Field Group.
4. Select the next field in the field group.
5. Write a prescription on the second field using the tabs. In the Review tab (fertilizer prescriptions)/VR Seed tab (seed prescriptions), click Create Fertilizer Rx and name the prescription.
6. Repeat steps 4 and 5 for every field in the Field Group.
7. On the last field in the Field Group, click Create Application.
8. The Select Available Rx’s window opens. Choose a prescription for each field, name the Field Group prescription, and click Confirm.